If after reading this you need more guidance, see the on-line training videos at:
www.softinterface.com/Convert-XLS/Documentation/
The user interface was made to allow for both simple and complex file conversion tasks.

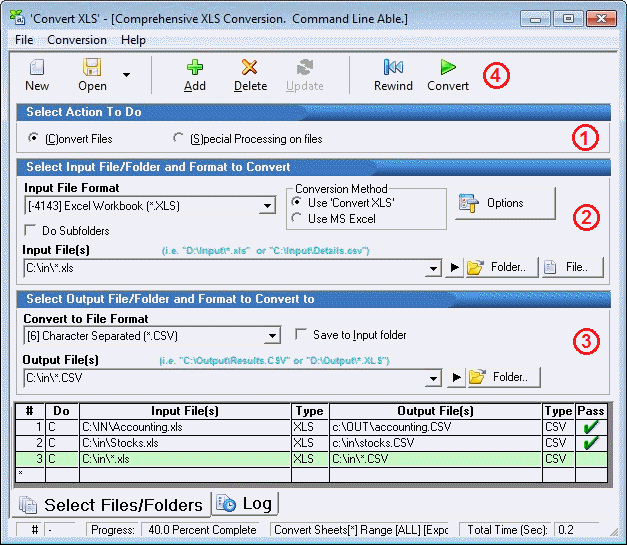
For every conversion job, you will need to take the following steps:
(1) Select Convert Files as the action to do.
(2) Select the conversion method, 'MS Excel' or 'Convert XLS'. Select the input file(s) to be converted from the “![]() File” or “
File” or “![]() Folder” buttons. Click the Options button at this time to specify items such as sheets, ranges, delimitation/ separation character, fixed width profiles etc.
Folder” buttons. Click the Options button at this time to specify items such as sheets, ranges, delimitation/ separation character, fixed width profiles etc.
(3) Specify an output location to store the converted file(s). If the output folder doesn’t exist, 'Convert XLS' will create it for you. If converting multiple files, you may also elect to do subfolder conversions by checking the Do Subfolders box. This option is only available once a folder has been selected for conversion.
(4) Optional: If you are going to specify more than one conversion item, press the Add button on the toolbar to add the task to the ‘Conversion Task List’. Repeat Steps 1- 4 as needed to add additional conversion tasks to the 'conversion job'.
Press the Convert button to begin the 'Conversion Job'.
Repeat steps 1-4 as many times as necessary to create a sophisticated ‘Conversion Job’. Conversion jobs can be saved, restored, and edited; they may also be run from the command line and built in scheduler. See the File menu to save or restore a conversion job.
Converting whole folders
In the picture above it shows the settings to convert every XLS found in the C:\IN\ folder to a CSV file. Notice the proper way to specify all files in a folder by specifying the wildcard *.XLS and *.CSV.
![]() The Quick Launch Buttons
The Quick Launch Buttons
Quick launch buttons are extremely helpful. They are located immediately to the right of the input and output file specification area and when clicked they will open the files specified in their default editor. If a folder is specified the quick launch button will open Windows Explorer using that specific folder for your review. Use these buttons to check the content of the input and output file/folders before or after conversions.
Modifying items in the task list
If you would like to make changes to an existing conversion item in the conversion task list, highlight that entry by clicking on it (double click for options associated with the item). The details associated with the item will be displayed in the upper portion of the user interface. Make whatever changes are necessary then click the Update button in order to save those changes. Note that you are overwriting the existing information in the conversion task list for that specific task. If you would rather save the information as a new entry, simply click the Add button and the original information will not be overwritten, rather a new, additional task will be added to the conversion task list.
Using non-standard file extensions
If your input or output files do not use standard file extensions you will have to specify the file type in the input or output file format drop down list box. For example if your Excel files are named MyExcelFile.ABC instead of MyExcelFile.XLS you must specify the file type.
See Also:
Conversion of File Types Detailed Discussion
Conversion of CSV, TSV or Any Character Delimited File
Fixed Width Text File Conversions