Quickly reading through this section will definitely make your work more efficient.
In order to use the profile editor you must set up two things within the program as shown below:
1. Select 'Convert XLS' conversion method (not 'MS Excel')
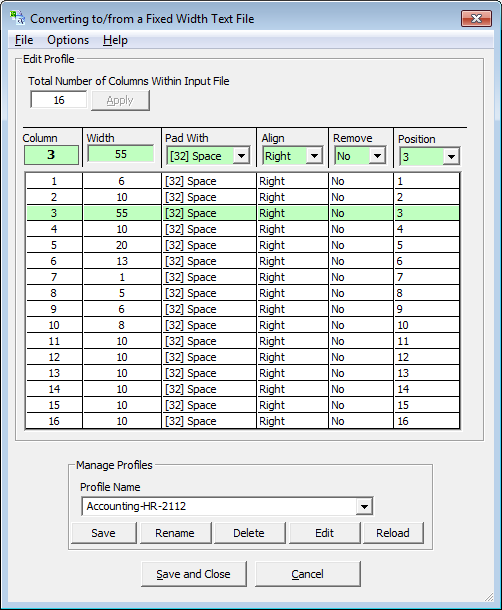
2. Press F3 to open the fixed width profile editor. It is shown below:
There are two main sections in form above, the editor and profile management.
Editing a Fixed Width Text Profile
The editor consists of a text box for the total number of columns, and an interactive grid used to specify each column's attributes.
Attribute |
Usage |
| Width | Number of characters the column uses. |
| Pad With | Specify pad character to use. When there is empty space (the data is smaller than the Width specified) this character will be used. Most often the space character is used. |
| Align | If one or more pad characters were used, specify which side should the data will be on. Right means the data is on the right, and the padding is on the left. |
| Remove | Skip this column from the INPUT file. |
| Position | Move the position of the columns in the OUTPUT file. That's right, you can re-order the columns to anything you want. |
Reducing the number of columns will erase the settings you had for the higher numbered columns. Increasing on the other hand will not disturb the existing profile settings, but instead will add one or more copies of the last column specified to the end of the profile.
Each row in the grid represents a single column in your fixed width text file. The highlighted green row is the item currently being edited. Modifying an entry is a matter of either typing in a number or making a selection in the drop down list boxes. Typing in a number always modifies the Width field. Pressing ENTER after typing in a number will automatically take you to the next column to be specified. Therefore, you can very quickly enter the profile widths one after the other. Typing "23 <enter> 14 <enter> 1 <enter>" for example can specify 3 column widths. Navigating the grid is also very easy. Up and down arrow, as well as Ctrl-Home, Ctrl-End, Page-Up and Page-Down all do what you expect.
Double clicking on any item will toggle the alignment value.
TIP: To start a new profile, enter 1 for the number of columns, and then press Apply. Next, specify how the majority of your columns attributes will be. Then, enter the correct total number of columns, and press the Apply button once more. This way you start with most of your settings being correct.
Profile Management
Do you have 2 or more profiles that you need to use or modify from time to time? If so, you are in luck, the built in profile management features allow you to store, recall, modify, rename and delete as many profiles as you like. Since the profile is stored as a simple text file this means you can have a any number of profiles, and easily back them up.
The location of the fixed width profiles on your computer is:
Windows Vista, 7 and newer
See the %AppData%\Softinterface, Inc\Convert XLS\profiles\ folder. The default is (based on user name):
C:\Users\Name\AppData\Roaming\Softinterface, Inc\Convert XLS\Profiles\
Versions Before Windows Vista (2000, XP etc)
See the \profiles folder within the installation folder. The default is:
C:\Program Files\Softinterface, Inc\Convert XLS\profiles\
Or for 64 bit operating systems:
C:\Program Files (x86)\Softinterface, Inc\Convert XLS\profiles\
TIP: If none of the above seems to get you to your profiles folder, within the user interface press the Edit button and it will open in Notepad. From there, go to the File\Save As menu item to see where the profiles are being stored.
TIP: The default profile name is: "Default-Profile". It is strongly recommended to rename your profile.
Each time a profile is created or removed a corresponding text file is created or removed from the \profiles\ folder. Because the profile name is also used as a file name, you may not use certain characters for the name such as the backslash.
To create a new profile simply type in a new name and press Save. If you want to manually edit a profile you can press the Edit button and Notepad will load the active profile. Note you can't edit a profile that has not been saved. Once edited and saved in notepad, you can click the Reload button to refresh the profile editor.
Profile File Specification
The profile is stored as a simple tab delimited text file. The first column is the column number, followed by the width, pad character, alignment, remove and position.
COLUMN_NUMBER<TAB>WIDTH<TAB>PAD_WITH<TAB>ALIGNMENT<TAB>REMOVE<TAB>POSITION
The pad character is stored as an ASCII number between the two [square brackets]. Use "Right" or "Left" for the alignment, "Yes" or "No" for remove. Empty lines should not exist in this file. A typical file might look like this (note the <TAB> character is really invisible):
1<TAB>10<TAB>[32] Space<TAB>Right<TAB>No<TAB>1
2<TAB>12<TAB>[32] Space<TAB>Right<TAB>No<TAB>2
3<TAB>2<TAB>[9] Tab<TAB>Left<TAB>No<TAB>3
4<TAB>15<TAB>[32] Space<TAB>Right<TAB>Yes<TAB>4
5<TAB>7<TAB>[32] Space<TAB>Right<TAB>No<TAB>5
6<TAB>9<TAB>[32] Space<TAB>Right<TAB>No<TAB>6
7<TAB>12<TAB>[32] Space<TAB>Right<TAB>No<TAB>7
See also:
Conversion of Fixed Width Text Files
Step by Step Example: Converting from Excel to a Fixed Width Text File
Step by Step Example: Converting from a Fixed Width Text File to Excel