This section discusses the user interface in detail.
Two simple concepts, conversion task and conversion job must be quickly introduced.
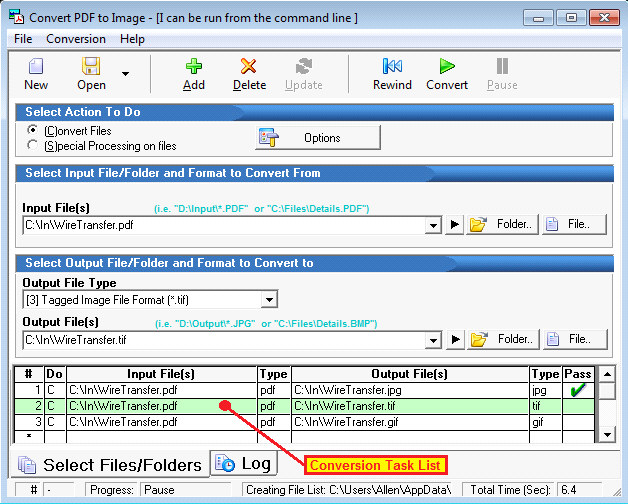
Obviously, before CPTI can do anything, you the user must specify what exactly is to be done. Each 'item' that is being processed is considered a conversion task. You specify a conversion task in the upper part of the program's user interface, and once completely specified, optionally press the Add button. As you add conversion tasks, you will see them listed sequentially in the bottom portion of the user interface called the conversion task list.
You may edit a conversion task by first selecting it by clicking it in the conversion task list. After changing the settings, click the Update button in the upper toolbar. Double clicking on a conversion task list item will open the options dialog box associated with the conversion item.
NOTE: The word "task" is used often in this manual, and is meant to refer to a single operation that shows up as a single row in the conversion task list.
When specifying a task, the very first thing you choose is whether it is going to be a conversion or special process task. File conversion takes a file and changes its type (i.e. from PDF to JPG).
If you are doing a conversion task, you’ll also specify the input and output file(s) as well as their respective file types. The Options button provides additional specifications.
One or more conversion tasks can be grouped together and are referred to as a Conversion Job which is discussed next.
A conversion job consists of those conversion tasks that you've specified and added to the conversion task list. Conversion jobs can be saved, edited and restored for future runs, saving you an enormous amount of time. See the File menu for saving and restoring conversion jobs.
The user interface was made to allow for both simple and complex conversion jobs. To perform a conversion task, first specify it in the upper area of the user interface, and then optionally click the Add button (in the upper toolbar) to add it to the conversion task list. If you are only going to have one conversion task, then don’t bother with the Add button.
Once there are one or more tasks in the task list, you can press the Convert button (also in the upper toolbar) to initiate the conversion job.
You can build conversion jobs, consisting of one or more conversion tasks, which may be saved, restored, and edited. Once saved, they may also be specified and run from the command line, making automating complex tasks a snap. See the file menu for saving and restoring conversion jobs.
Editing or removing conversion tasks within a conversion job is very simple.
To edit a task, first highlight it (click on it with the mouse) in the conversion task list. When you've selected the task, all its conversion properties will be properly displayed in the upper portion of the user interface. Modify the conversion task properties as necessary, and then press the Update button (or ALT+U). This saves the changes to the conversion task list. Note: Failure to press Update will cause the changes to be lost if you have more than one conversion item.
To remove a task, highlight it in the task list, and then press the Delete button (or ALT+D).
You may save a conversion job for later use by using the Save item on the File menu (or CTRL+S) or by clicking the dropdown arrow beside the Open button on the toolbar. You may pause a job, and then save, reloading will bring you back to where you last saved the job.
IMPORTANT!!! Be certain to REWIND before you save a conversion job file if you want to start from the beginning the next time you load the file.
Opening a conversion job is just as simple. Use the File\Open Conversion Job menu item, CTRL+O shortcut, or click the dropdown arrow beside the Open button on the toolbar and select “Open Conversion Job”. Conversion Job files have an *.SII file extension (SII is for SoftInterface,Inc).
If you want to start fresh, you can begin a new Conversion Job by clicking the New button on the toolbar, selecting New Conversion Job from the File menu, or by pressing CTRL+N.
NOTE: Creating a new conversion job completely erases all items currently in the conversion task list.
The Log contains any problem files encountered during conversion. If any entries exist in the Log, you can save them as a conversion job for processing at a later time, with different methods. The "Save Log as a Conversion Job" menu item is located in the file menu and is also accessed by clicking the dropdown arrow beside the ‘Open’ button.